📓 Request-Response Loop and HTTP Methods with ASP.NET Core MVC
In the How the Web Works series of lessons from the weekend homework, we learned how websites and applications communicate with users' clients to display their content in the browser. We discussed clients and servers, uniform resource locators (URLs), server-side MVC patterns, and the request-response loop.
Now that we've created several applications that handle HTTP requests and responses through controller routes, let's dive deeper. This lesson will review the general request-response loop we learned earlier this section and also discuss new HTTP methods that will shed light on how MVC routes work. Concepts discussed here are essential to understanding the more advanced routing we'll learn later in this section, so follow along carefully and revisit this lesson as necessary.
First, let's walk through the request-response loop we learned about previously, discussing in greater detail how it works with ASP.NET Core MVC applications.
1. Generating a Request
To access a page on a website, including one made with ASP.NET MVC, the user either types in the site's URL, clicks a link, or submits a form. The client makes a request to the server that hosts the site. As we learned earlier this section, this request follows strict formatting rules called HTTP, or Hypertext Transfer Protocol. Specifically, HTTP requests from the client include four elements that will be sent to the server:
- Method
- Path
- Headers
- Body
HTTP Methods
HTTP methods, also known as verbs, indicate the type of action the client is requesting the server to complete. The most common HTTP methods are GET and POST.
GET Requests
Requests with GET methods retrieve resources from the server. For example, when we navigate to the Learn How to Program Tracks page the client requests the resource at the URL https://www.learnhowtoprogram.com/tracks. The server locates the content corresponding to the /tracks URL path and sends it back to the client in a response. Our client essentially went out and got the necessary resources to render a page.
POST Requests
Unlike GET requests, POST requests actually aim to change something on the website's server. This includes adding, updating or deleting items.
For instance, when we like a friend's photo on social media, our client is sending a POST request because we're changing something on that site's server. We're both increasing the total number of likes recorded on that photo and adding our username to the list of those that like the picture.
In the last lesson, we added this attribute to our To Do List form:
method="post"
We did this because we wanted to add an Item.
Path
In addition to an HTTP method, the client's request to the server also includes a path. The path identifies the web resource that should be retrieved (GET) or acted on (POST). In the example https://www.learnhowtoprogram.com/tracks the resource /tracks is known as the path.
If we were visiting the form in our To Do List application, /items/new is the path.
Headers
Headers are also part of the request message protocol. They provide the server with more information about the client, the server and the request. Here are some examples of header fields included in a request message:
- Host: This is the host or domain name of the server. Examples include
www.learnhowtoprogram.comandlocalhost:5001. - User-agent: This is the software acting on behalf of the user to make the request. In our example, this would be our browser, whether it's Chrome, Firefox, or something else.
- Accept-language: This includes the human languages that are acceptable for the response.
There's no need to worry about headers too much yet. But for a list of all available request headers, check out the HTTP Headers Wikipedia article.
Body
HTTP Requests also include a body. The body contains any data (beyond the URL and headers) that must be transmitted to the server.
For example, when a user submits the form in our To Do List, the resulting POST request needs to include the specific information they typed in the form so the server can store this information as a new Item and later print it to our list. This data is delivered to the server in the body of the request.
Viewing Requests
Remember, we can view HTTP requests and responses right in Chrome's developer tools:
- Launch the To Do List application using
$ dotnet run. - Visit the app at
localhost:5000and open developer tools (Command + Option + J on Mac or Ctrl + Shift + I on PC). - Select the Network tab (fourth from the left) on the top toolbar of the developer tool pane.
- The second-from-top toolbar contains a checkbox titled Preserve log. Select this box.
- Keeping this Network area open, hit the Add a new item link on our site's homepage. We should see a new request logged in the developer's tools. We can click this request to see details, including its URL, the GET HTTP request method it used, its headers, and more:
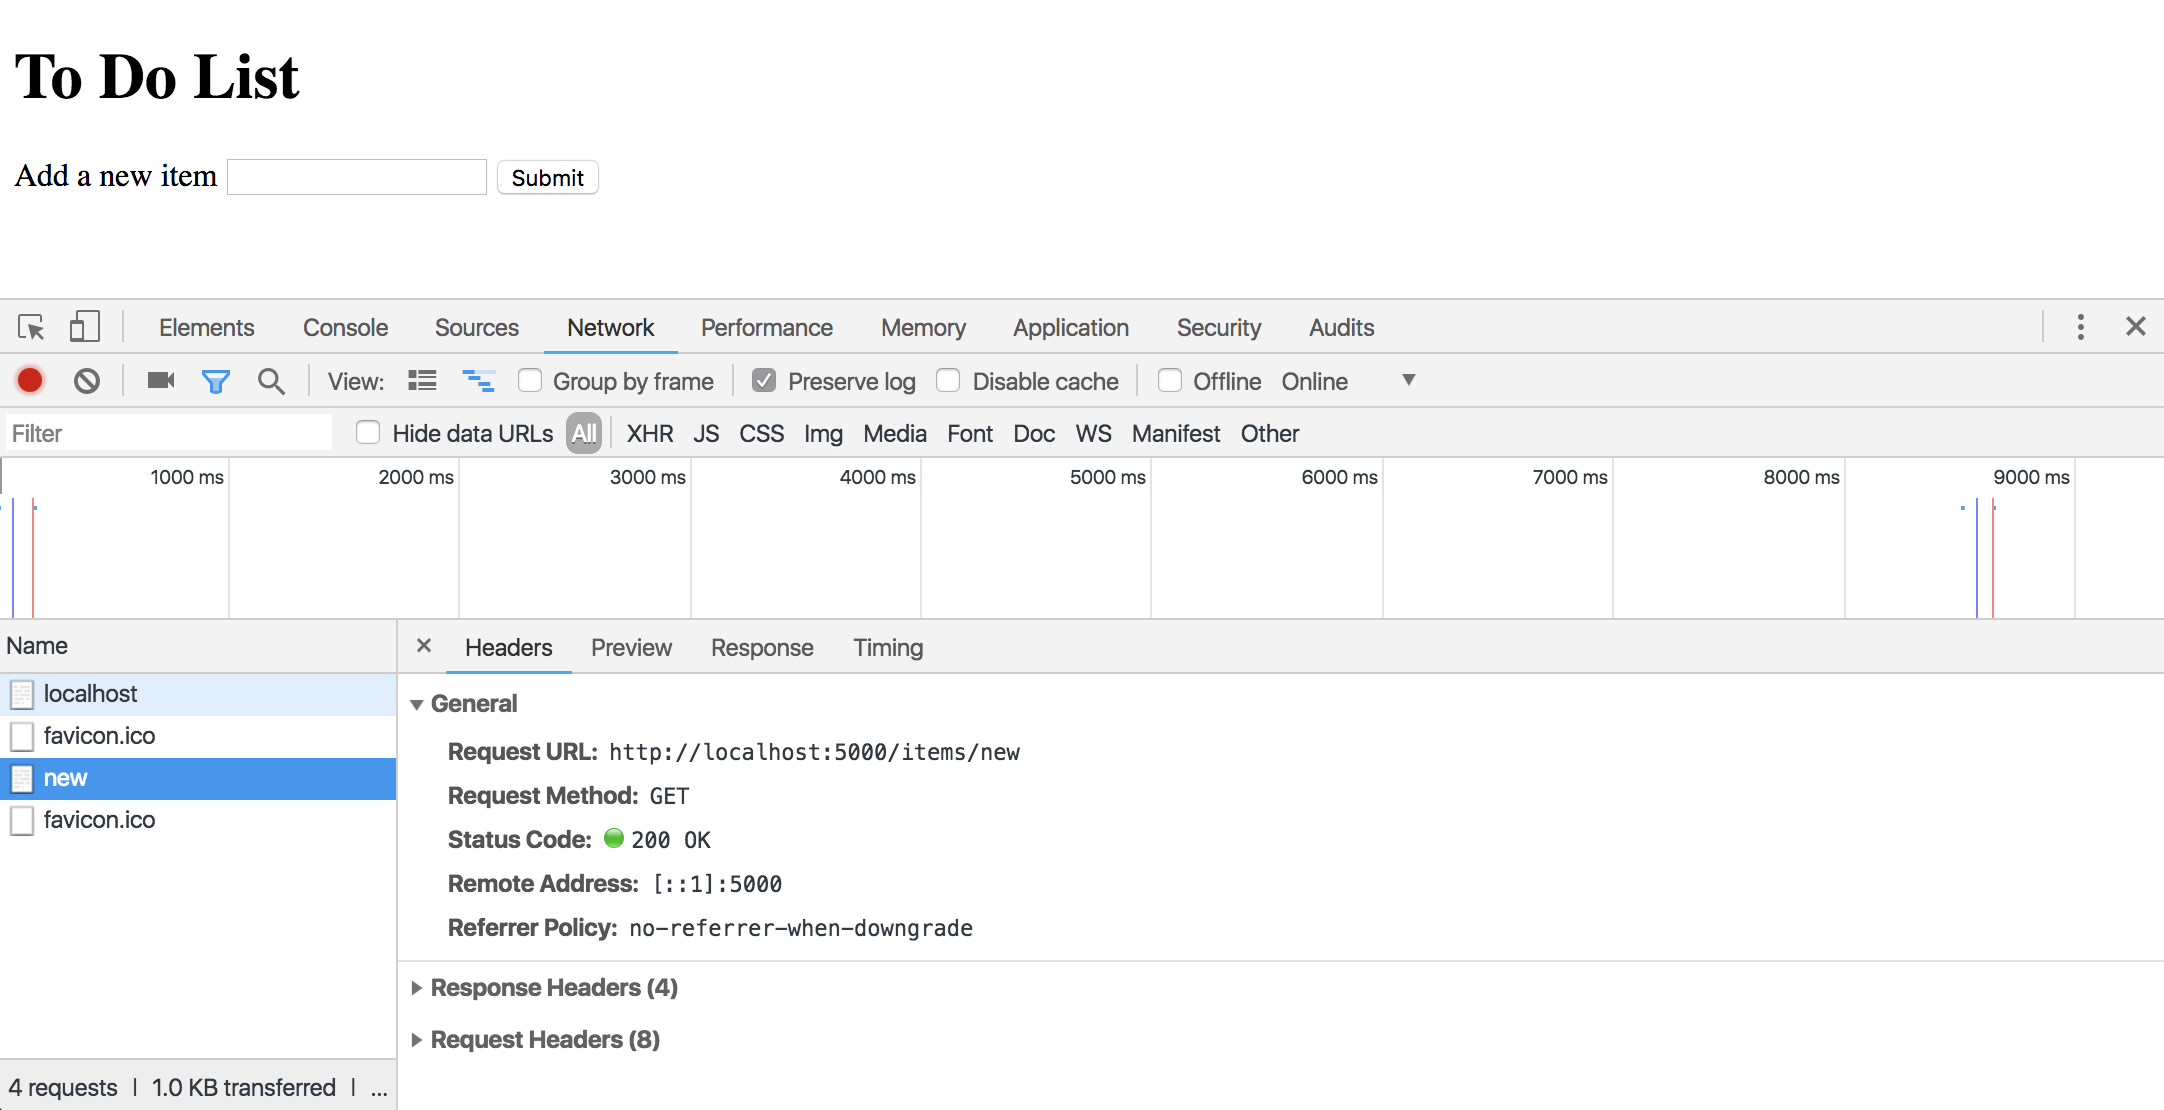
- Then we can fill out and submit our form to see yet another request. This time we see it's a POST request. If we scroll down, we can view its response headers and form data included in the request body:
2. Routing in MVC Controllers
After the client sends a request, the server receives it. The HTTP method and path are matched to a route in the controller.
The controller is then responsible for bringing view data and class methods together. In our MVC applications, route decorators state the path that corresponds to each:
...

  [Route("/")]
  ...

  [Route("/items/new")]
  ...

  [Route("/items")]
  ...

...
For example, users can click a link on our homepage to see a form. When they click on this link, a request is created and sent to our application's server. That request includes the path "/items/new".
Our application server can identify what resource should be retrieved and sent back in its response by matching this path to the route in our controller that has the same path specified in the route decorator. It then executes that route's code.
Route Decorator Syntax
So far, we have used the syntax [Route("route-name")] to declare paths for each route in our controller. Now that we know what GET and POST indicate, we'll begin using a different, more specific annotation for defining the routes for methods. We'll use [HttpGet("route-name")] for GET methods and [HttpPost("route-name")] for POST methods.
Our updated HomeController.cs looks like this:
using Microsoft.AspNetCore.Mvc;
using ToDoList.Models;

namespace ToDoList.Controllers
{
  public class HomeController : Controller
  {

    [HttpGet("/")]
    public ActionResult Index()
    {
      Item starterItem = new Item("Add first item to To Do List");
      return View(starterItem);
    }

    [HttpGet("/items/new")]
    public ActionResult CreateForm()
    {
      return View();
    }

    [HttpPost("/items")]
    public ActionResult Create(string description)
    {
      Item myItem = new Item(description);
      return View("Index", myItem);
    }

  }
}
3. Returning a Response
After the client creates and sends a request and our server matches the path in this request to the correct route, our server then returns an HTTP Response back to the client. Like our requests, this response is also formatted following special HTTP protocol. It consists of three primary elements:
- Status
- Headers
- Body
Status
The first line of a response message is a status code and reason phrase. (An example is 200 OK, which is shown in the picture above.) The HTTP status code is a three-digit number that indicates how the request was processed (or not). Each is accompanied by a brief, human-readable description.
Below is a list of the five status code classes determined by the first digit of the code, and their most common codes. You don't have to memorize these; simply get an idea of what's out there, and refer back as necessary. (And, to see a complete list, visit HTTP Status Codes.)
- Informational: Status codes beginning with
1indicate the request was received. This class of code is rarely used. - Success: Status codes beginning with
2indicate the request was received and handled successfully. These are very common. For example:
- 200: OK
- 201: Created
- Redirection: Status codes beginning with
3indicate that additional action is required to complete processing the request. For example:
- 301: Moved permanently
- 302: Moved temporarily
- Client Errors: Status codes beginning with
4indicate that something was wrong about the request. Some of the most common include:
- 400: Bad Request (the request used invalid syntax)
- 401: Unauthorized (you have to log in)
- 403: Forbidden (you're logged in, but not allowed to make this request)
- 404: Not Found
- 422: Unprocessable (the request had valid syntax but the instructions it contained were invalid)
- Server Errors: Status codes beginning with
5indicate that something went wrong on the server side, such as a bug in the code or a server that went down. For example:
- 500: Internal Server Error (usually a bug in the server code)
- 502: Bad Gateway (the server sent the request to another server and got an invalid response)
- 503: Service Unavailable (the server is overloaded or down for maintenance)
Headers
Like request headers, response headers include additional protocol providing more details about the HTTP response. Some examples of response header fields include:
- Server: The name of the server where the response is coming from.
- Content-Language: The human language(s) of the content.
- Content-Length: How long the response body is in 8-bit bytes.
For a list of all possible response headers, visit this article on Wikipedia.
Body
The response body includes all of the content for the resource requested. It's often referred to as the payload. When we issue a GET request for the /items/new path of our To Do List, we expect the body to include an HTML document with the form we created to make new Items.
The last line of code in a controller route indicates the resource that should be returned in the body of the response. In the case of our application, the resource is a view.
4. Rendering the Page
When the browser receives the response from the server, it then renders the HTML into a viewable format for the user. The whole process begins again as the user actions trigger additional requests for the server to manage.
Repository Reference
Follow the link below to view how a sample version of the project should look at this point. Note that this is a link to a specific branch in the repository.
Example GitHub Repo for To Do List: 2_forms_and_http_methods